


 🔔 Affiliate Disclosure
This content may contain affiliate links. If you click on a link and make a purchase, we may receive a small commission — at no extra cost to you. Thank you for supporting BeatInsights! 💛
🔔 Affiliate Disclosure
This content may contain affiliate links. If you click on a link and make a purchase, we may receive a small commission — at no extra cost to you. Thank you for supporting BeatInsights! 💛
The Heartfelt Tradition of Pan de Muerto
Pan de Muerto is a cherished sweet bread from Mexico. It holds a central place in the annual Day of the Dead (Día de Muertos) celebrations. This iconic bread, with its unique flavor profile and distinctive shape, is more than just a treat. It is a symbol of remembrance and a connection to those who have passed on. This blog section offers a complete guide, including a genuine Pan de Muerto Recipe. You will learn how to make Pan de Muerto, delving into its history and symbolism.
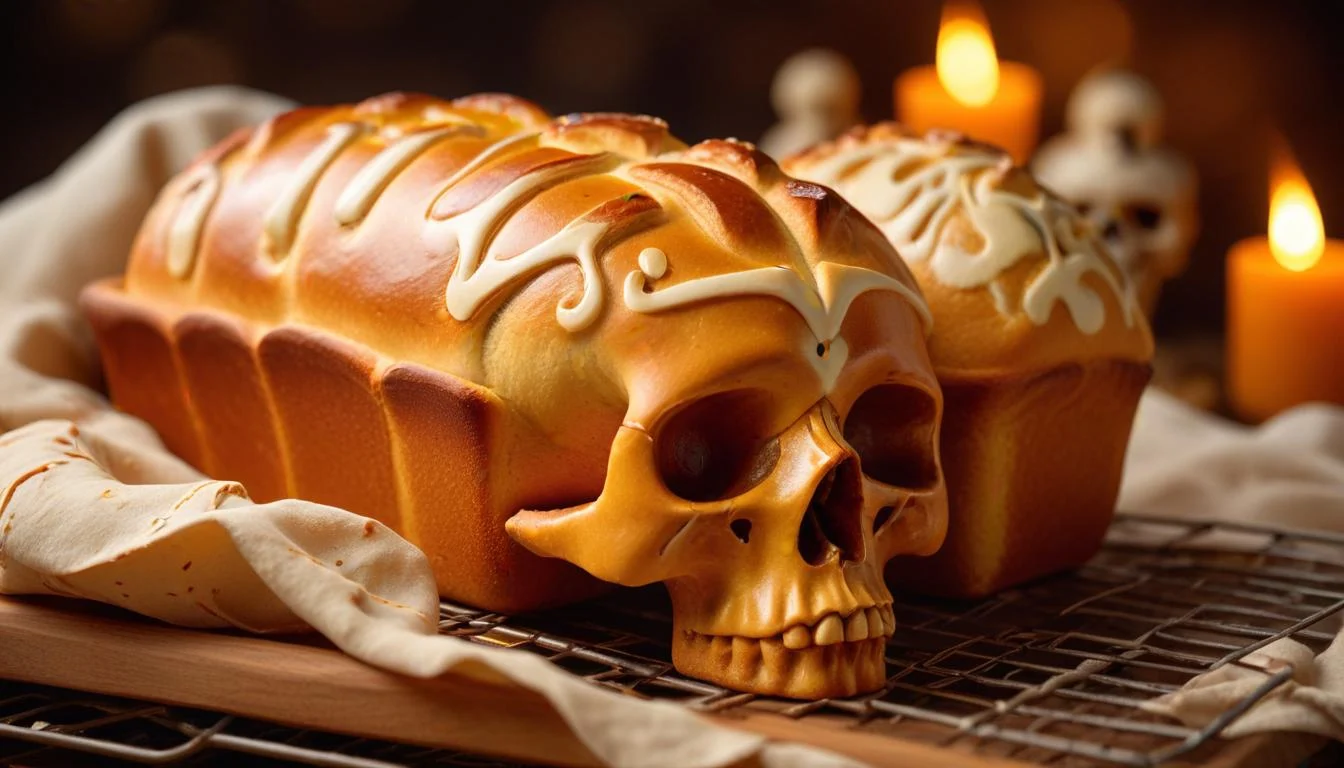
What is Pan de Muerto? This is a lightly sweet bread, often flavored with orange blossom or anise. Its round base often features decorative “bones” and a “teardrop” on top. These elements represent a skull and tears for the departed. The bread’s soft texture and aromatic scent make it a comforting presence during the festivities. Its significance as a traditional Pan de Muerto bread offering cannot be overstated.
Its Significance in Day of the Dead
Pan de Muerto serves as a key offering on ofrendas, or altars, during Day of the Dead. Families place this bread alongside photos, candles, and other favorite foods of their ancestors. This gesture welcomes the spirits back home for a brief visit. Therefore, it symbolizes life, death, and rebirth. It bridges the living world with the spirit world. These Day of the Dead bread offerings are deeply meaningful. They connect people with their heritage and celebrate the lives of loved ones.
This guide provides a comprehensive, step-by-step Pan de Muerto Recipe. It ensures an authentic baking experience. You will find practical tips, troubleshooting advice, and cultural insights. This allows for a truly meaningful bake. Preparing this bread lets you participate in a beautiful, ancient tradition.
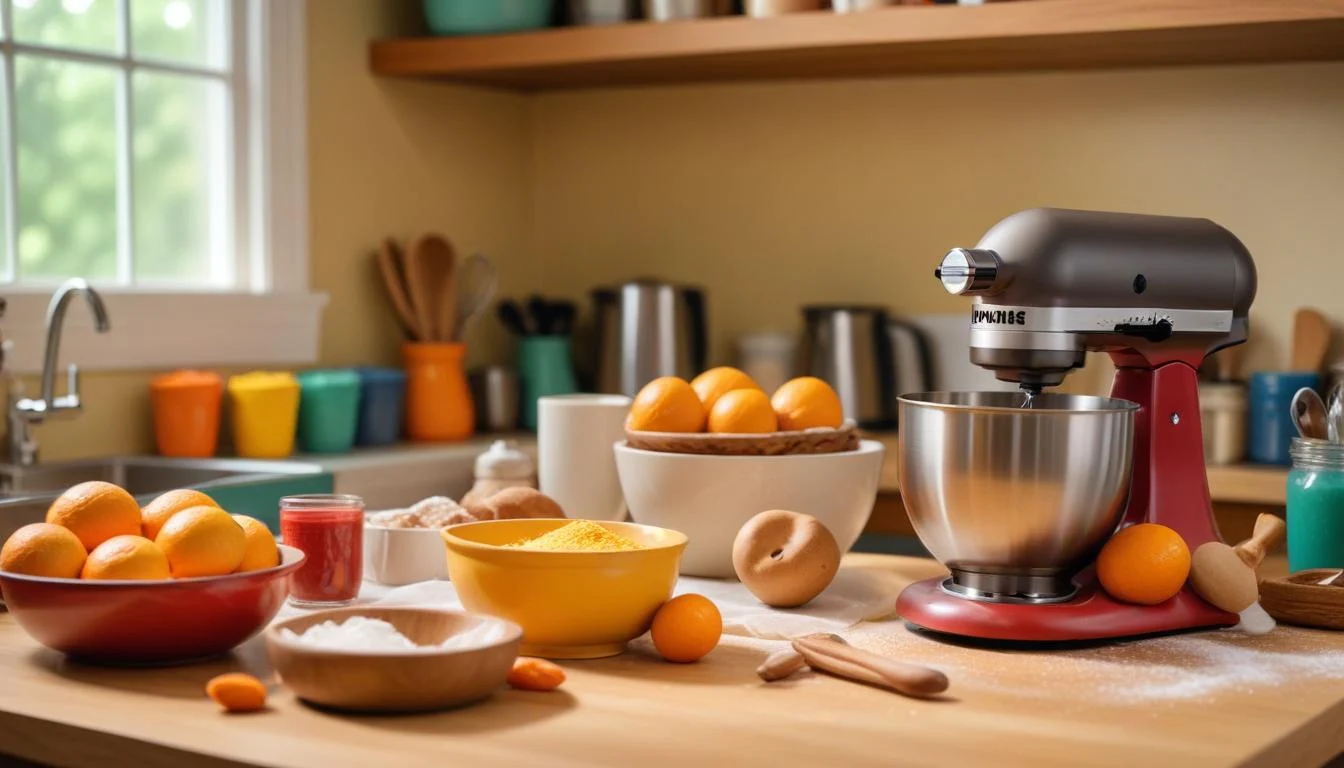
Essential Ingredients for Authentic Pan de Muerto
Creating an authentic Pan de Muerto starts with selecting the right ingredients. Each component contributes to the bread’s unique taste and texture. Understanding their roles is key to a successful bake.
Dry Ingredients for Your Pan de Muerto
First, all-purpose flour forms the bread’s structure. Precise measurement is critical for consistency. Too much flour makes the bread dense, while too little results in a sticky dough. Granulated sugar adds sweetness, balancing the savory notes. A pinch of salt enhances all flavors. Active dry yeast is essential for leavening. Always check its freshness to ensure a good rise. Old yeast can lead to a flat, heavy bread.
Wet Ingredients and Flavor Enhancers
Whole milk makes the bread rich and tender. Warm it slightly to activate the yeast. Unsalted butter, melted and cooled, adds moisture and a delicate flavor. Large eggs bind the ingredients and contribute to a golden crust. Orange zest provides the signature citrus aroma. It brightens the bread’s overall taste. Moreover, orange blossom water or anise seeds offer traditional flavor profiles. Orange blossom water gives a floral, sweet note. Anise seeds provide a subtle, licorice-like warmth. Many find this combination delightful in a homemade Pan de Muerto recipe.
Sourcing Quality Ingredients
Finding specialty items like orange blossom water might require a trip to a Mexican grocery store or online retailer. Gourmet Mexico recommends quality ingredients for traditional dishes. Always ensure your active dry yeast is fresh. Check the expiration date. Fresh yeast guarantees a successful rise for your traditional Pan de Muerto bread.
Optional Ingredients and Substitutions
You can explore variations for different flavor preferences. Some recipes include a touch of cinnamon. Others might use orange juice instead of zest and water. However, stick to the classic orange blossom water or anise for a truly traditional Pan de Muerto. Substituting ingredients can alter the final taste and texture. Therefore, proceed with caution.
Gathering Your Tools for Baking Success
Having the right equipment makes the baking process smoother and more enjoyable. A well-prepared kitchen helps ensure a perfect Pan de Muerto Recipe.
Essential Kitchen Tools
You will need large mixing bowls. One is for proofing the yeast, another for combining ingredients. A stand mixer with a dough hook attachment is highly recommended. It handles the kneading process efficiently. However, hand kneading is also possible. Measuring cups and spoons are crucial for accurate ingredient amounts. Baking sheets, lined with parchment paper, prevent sticking and aid cleanup. Finally, a wire cooling rack allows air circulation, cooling the bread properly.
Helpful Optional Tools
A dough scraper can make handling sticky dough much easier. A pastry brush is useful for applying glazes. A kitchen scale offers the most precise ingredient measurement. It helps achieve consistent results every time. These tools, while not strictly necessary, can greatly improve your baking experience.
Setting Up Your Baking Station
Organize all your ingredients and tools before you begin. This practice is known as mise en place. It ensures a smooth and efficient baking process. Clear your counter space. Have everything within easy reach. This preparation prevents last-minute scrambling and allows you to focus on crafting your delicious Pan de Muerto.
Crafting the Dough: Your Pan de Muerto Recipe (Part 1: Mixing & Kneading)
This section guides you through the initial stages of making your authentic Pan de Muerto bread. Proper mixing and kneading are vital for a light, airy texture.
Activating the Yeast
Begin by combining active dry yeast, warm milk, and a pinch of sugar. The milk should be warm, not hot. Too hot will kill the yeast. Let this mixture sit for about 5-10 minutes. It should become foamy and bubbly. These are clear signs of a healthy, active yeast mixture. This step is the foundation for fluffy bread.
Combining Dry and Wet Ingredients
In a large mixing bowl, combine the flour, remaining sugar, and salt. Make a well in the center. Gradually pour the activated yeast mixture into the well. Begin mixing with a spoon or your stand mixer. As the dough comes together, add the melted butter, eggs, orange zest, and orange blossom water. Mix until well combined. The dough will look shaggy at first.
Kneading for the Perfect Dough
If using a stand mixer, attach the dough hook. Knead on medium-low speed for 8-10 minutes. The dough will pull away from the sides of the bowl. For hand kneading, turn the dough onto a lightly floured surface. Knead for 12-15 minutes. Push, fold, and turn the dough. It should become smooth, elastic, and slightly sticky. This extensive kneading develops the gluten. It is crucial for the bread’s characteristic chewiness.
The First Rise
Lightly grease a clean mixing bowl. Place the kneaded dough inside. Turn it once to coat. Cover the bowl with plastic wrap or a clean kitchen towel. Find a warm, draft-free environment for its initial fermentation. A slightly warm oven (turned off) works well. Let the dough rise for 1 to 1.5 hours. It should double in size. This proofing stage develops flavor and volume.
Shaping the Iconic Pan de Muerto (Part 2: Shaping & Second Rise)
After the first rise, it is time to give your Pan de Muerto its iconic form. This step is where the artistry of this traditional bread comes to life. Following these steps will help you create beautiful Day of the Dead bread offerings.
Dividing the Dough
Gently deflate the risen dough by punching it down. Turn it onto a lightly floured surface. Portion the dough carefully. Most of the dough will form the main bread base. A smaller portion is reserved for the decorative “bones” and “teardrop.” For instance, divide the dough into individual bread portions. Then, take about one-fifth of each portion for decorations.
Forming the Main Bread Base
Take each larger portion of dough. Roll it into a smooth, tight ball. Tuck the edges underneath to create a taut surface. This technique ensures a nice, round shape. Place these dough balls onto prepared baking sheets. Leave enough space between them for expansion.
Creating the “Bones” and “Teardrop”
From the reserved dough, roll out thin strips. These will become the “huesitos” or “little bones.” To make the bone shape, roll a strip. Then press down with the side of your hand or a finger in two or three places. This creates an indentation, making it look like knuckles. You will need four “bones” per bread. Arrange two “bones” crossing over the top of each main bread base. These should fan out from the center. Finally, roll a small piece of dough into a smooth ball. This represents the “lagrima” or “teardrop.” Place this small ball in the center where the “bones” meet. This completes the traditional Pan de Muerto bread design. Your Pan de Muerto Recipe is almost complete.
Crafting a traditional Pan de Muerto recipe honors ancient customs. Learning how to make Pan de Muerto involves specific steps, from dough shaping to glazing. This traditional Pan de Muerto bread is a key part of Day of the Dead bread offerings. Understanding Pan de Muerto history and symbolism adds depth to your baking. This guide helps you perfect your Pan de Muerto recipe.
Forming Decorative Elements
Shaping the decorative elements brings your Pan de Muerto to life. First, form a small ball of dough. This represents the “teardrop” or “skull” at the top of the loaf. Next, roll out thin strands of dough. These will become the “bones” or huesitos. Create indentations in the strands to resemble knuckles. This gives them a distinct look.
Attach these decorative pieces carefully. Use a little water or egg wash as glue. Brush a small amount onto the bread where you plan to place the elements. Gently press the pieces into place. Make sure they adhere well. These additions are vital to the Pan de Muerto’s symbolic meaning. Precision in this step leads to a beautiful presentation.
The Second Rise: Developing Texture and Aroma
After shaping, your bread needs to proof again. This is known as the second rise. Place the shaped Pan de Muerto on a baking sheet. Cover it loosely with plastic wrap or a clean kitchen towel. This prevents the dough from drying out. Let the bread rest in a warm, draft-free place. The yeast will continue its work, making the dough light.
Patience is very important during this stage. A proper second rise ensures light and airy results. Rushing this step leads to dense, heavy bread. Allow enough time for the dough to double in size. This can take anywhere from 1 to 2 hours. Temperature affects proofing time. Warmer spots shorten the wait.
Look for visual cues to know when your bread is ready. The dough should look puffed up. It will feel very soft and airy to the touch. A gentle poke with your finger should leave a slight indentation. This means the bread is proofed enough for baking. If the indentation springs back immediately, it needs more time. Do not over-proof, or the bread may collapse.
Baking & Glazing: The Final Touch for Your Pan de Muerto
Preheating Your Oven: Essential for Even Baking
Preheating your oven correctly is a crucial first step. Set the oven to the specified temperature in your Pan de Muerto recipe. Typically, this is around 350-375°F (175-190°C). Allow ample time for the oven to reach this temperature. Moreover, let it stabilize for at least 15-20 minutes. This ensures even heat throughout the baking process.
Oven rack placement also affects heat distribution. Position the rack in the middle of the oven. This allows the bread to bake evenly on all sides. Heat circulates best in this spot. Avoid placing the bread too close to the top or bottom elements. This prevents burning or uneven baking. Consistent heat helps achieve a perfect crust.
Baking Your Traditional Pan de Muerto Bread to Golden Perfection
Bake your Pan de Muerto for the ideal time and temperature. A common range is 25-35 minutes at 350-375°F (175-190°C). Baking time varies based on your oven and loaf size. Monitor the bread closely during the final minutes. This prevents overbaking. A perfectly baked loaf boasts a beautiful finish.
Look for specific visual cues to determine doneness. The crust should be a lovely golden brown color. This indicates it is cooked through. Tap the bottom of the loaf gently. It should produce a hollow sound. This confirms the inside is fully baked. Remove the bread from the oven immediately once done. Let it cool slightly before glazing.
Preparing the Signature Glaze or Coating
The glaze adds the sweet finish to your Pan de Muerto. A simple sugar glaze is popular. Combine water, sugar, and orange zest in a small saucepan. Heat until the sugar dissolves completely. Simmer for a few minutes until slightly thickened. This glaze provides a delicate sweetness.
Another classic option is a butter and sugar coating. First, melt some unsalted butter. Brush this melted butter generously over the warm bread. Then, roll the bread in granulated sugar. This creates a delightful sugary crust. Some recipes call for colored sugars for a festive look. Consider using orange blossom water for extra aroma.
Applying the Glaze: The Sweet Finish
Apply the glaze or coating to the warm bread. Do this immediately after removing it from the oven. The warmth helps the glaze absorb better. If using the sugar glaze, brush it evenly over the entire surface. Ensure all the decorative elements are covered.
For the butter and sugar coating, brush on the butter first. Then, gently roll the warm bread in a shallow dish of sugar. Make sure to achieve an even, sugary coating. This final step transforms your traditional Pan de Muerto bread. It gives it the iconic look and taste. Let the glazed bread cool completely on a wire rack.
The Rich History & Cultural Significance of Pan de Muerto
Origins: From Pre-Hispanic Offerings to Spanish Influence
Pan de Muerto boasts deep historical roots. Its origins trace back to ancient Aztec rituals. These involved human sacrifices and offerings. The bread served as a symbolic substitute for human hearts. Early versions were likely made from amaranth, a native grain.
The arrival of the Spanish transformed these traditions. European baking techniques merged with indigenous practices. Wheat flour, yeast, and sugar became common ingredients. This adaptation led to the Pan de Muerto we know today. The bread represents a blend of cultures. It reflects centuries of tradition.
Symbolism of the Shape: Every Detail Tells a Story
Every detail of Pan de Muerto carries meaning. The round loaf represents the cycle of life and death. It symbolizes the continuity of existence. The “bones” or huesitos draped across the top signify the deceased. They remind us of those who have passed.
The small ball on top is highly symbolic. It can represent a skull, or a teardrop for sorrow. This single element encapsulates grief and remembrance. Often, the bread includes flavors like anise or orange blossom. These scents connect to preferences believed to be held by the dead. These aromas guide returning souls.
Its Role on Altars (Ofrendas)
Pan de Muerto holds a central place on altars, called ofrendas. These altars are built to honor and welcome returning souls. The bread acts as a welcoming gift. It is an essential element among other offerings. These include candles, photos, and favorite foods of the deceased.
Regional variations exist across Mexico. Decoration and flavor can differ widely. Some regions use sesame seeds. Others add bright colored sugars. These variations highlight the rich diversity of Mexican culture. The bread is a tribute, a connection, and a culinary rite.
Connecting with Ancestors: A Culinary Rite
Baking and sharing Pan de Muerto is a spiritual act. It connects the living with their ancestors. This culinary rite reinforces family bonds. It keeps memories alive. Sharing this bread during Día de Muertos bridges time. It ensures cultural heritage passes to new generations. This traditional Pan de Muerto bread is more than just food. It is a symbol of enduring love.
Pro Tips, Troubleshooting & Variations for Your Pan de Muerto
Common Issues and How to Solve Them
Bakers sometimes face challenges with their Pan de Muerto recipe. If your dough is not rising, check your yeast. Ensure it is fresh and active. Verify water temperature; too hot or cold kills yeast. Warm water (105-115°F) is ideal.
Dry or tough bread often results from over-kneading. Too much flour can also cause this. Add flour slowly and stop when the dough is soft. Cracked crusts might stem from uneven oven temperatures. Insufficient steam in the oven can also contribute. Place a pan of water in the oven for steam.
Tips for a Perfect Bake Every Time
Follow these tips for consistently perfect results. Do not rush the proofing process. Allow the dough ample time to rise fully. This develops flavor and texture. Maintain a consistent oven temperature. Use an oven thermometer for accuracy. Preheating thoroughly is also important.
Avoid overbaking your Pan de Muerto. Overbaking leads to a dry, crumbly texture. Pull the bread when it is golden brown and sounds hollow. A tender crumb is the goal. Your traditional Pan de Muerto bread will be delicious.
Ingredient Variations & Flavor Enhancements
Explore ingredient variations to customize your Pan de Muerto. Add different citrus zests for a unique twist. Lemon or lime zest can complement the orange flavor. Incorporate warm spices like cinnamon or nutmeg. These add depth and aroma. Cardamom also works well.
Consider different toppings beyond the usual. A sprinkle of sesame seeds provides a nutty crunch. Use vibrantly colored sugars for a festive look. Experiment with chocolate drizzle for a modern twist. These small changes make your Pan de Muerto recipe unique.
Storage Suggestions for Freshness
Store your Pan de Muerto properly to keep it soft. Once completely cooled, place it in an airtight container. A bread box also works well. This prevents the bread from drying out too quickly. It stays fresh for 2-3 days at room temperature.
For longer preservation, consider freezing options. Wrap the cooled bread tightly in plastic wrap. Then, place it in a freezer-safe bag. It can be frozen for up to one month. Thaw at room temperature when ready to enjoy. Refresh gently in a warm oven.
Serving Suggestions: How to Enjoy Your Pan de Muerto
Enjoy your freshly baked Pan de Muerto in traditional ways. It pairs wonderfully with a cup of rich hot chocolate. Try it with a warm coffee for breakfast. Serving it with atole, a warm masa drink, is also classic. This creates a comforting experience.
Sharing this Day of the Dead bread offering with family and friends is key. It embodies the spirit of Día de Muertos. Gather loved ones to celebrate and remember. This simple act reinforces cultural traditions. Your Pan de Muerto recipe will be a cherished part of your celebration.
Conclusion: Savoring the Spirit of Pan de Muerto
Baking Pan de Muerto is a rewarding journey. You have learned how to make Pan de Muerto from shaping to glazing. This process connects you to a rich cultural heritage. The joy of baking this traditional bread extends beyond the kitchen. It emphasizes its significance beyond just a recipe.
We encourage you to bake and share this special bread. Bring the spirit of Día de Muertos into your home. Create new family traditions with this meaningful bread. Share your Pan de Muerto creations with others. Comment with your favorite memories or tips.